5 min to read
[Jenkins] Jenkins를 활용한 CI/CD 파이프라인 구축 (3)
Jenkins, EC2, AWS, Docker, CI/CD
[Jenkins] Jenkins를 활용한 CI/CD 파이프라인 구축 (3)
1. Git Credentials 관리
-
Jenkins에 Git 관련 credentials 추가
- 우선 자신의 GitHub에 접속한다. profile의 settings > Developer settings > Personal access tokens에 들어가 자기가 원하는 scope를 설정하여 token을 생성한다. (여기서는 repo 정도의 scope만 설정하였다.)
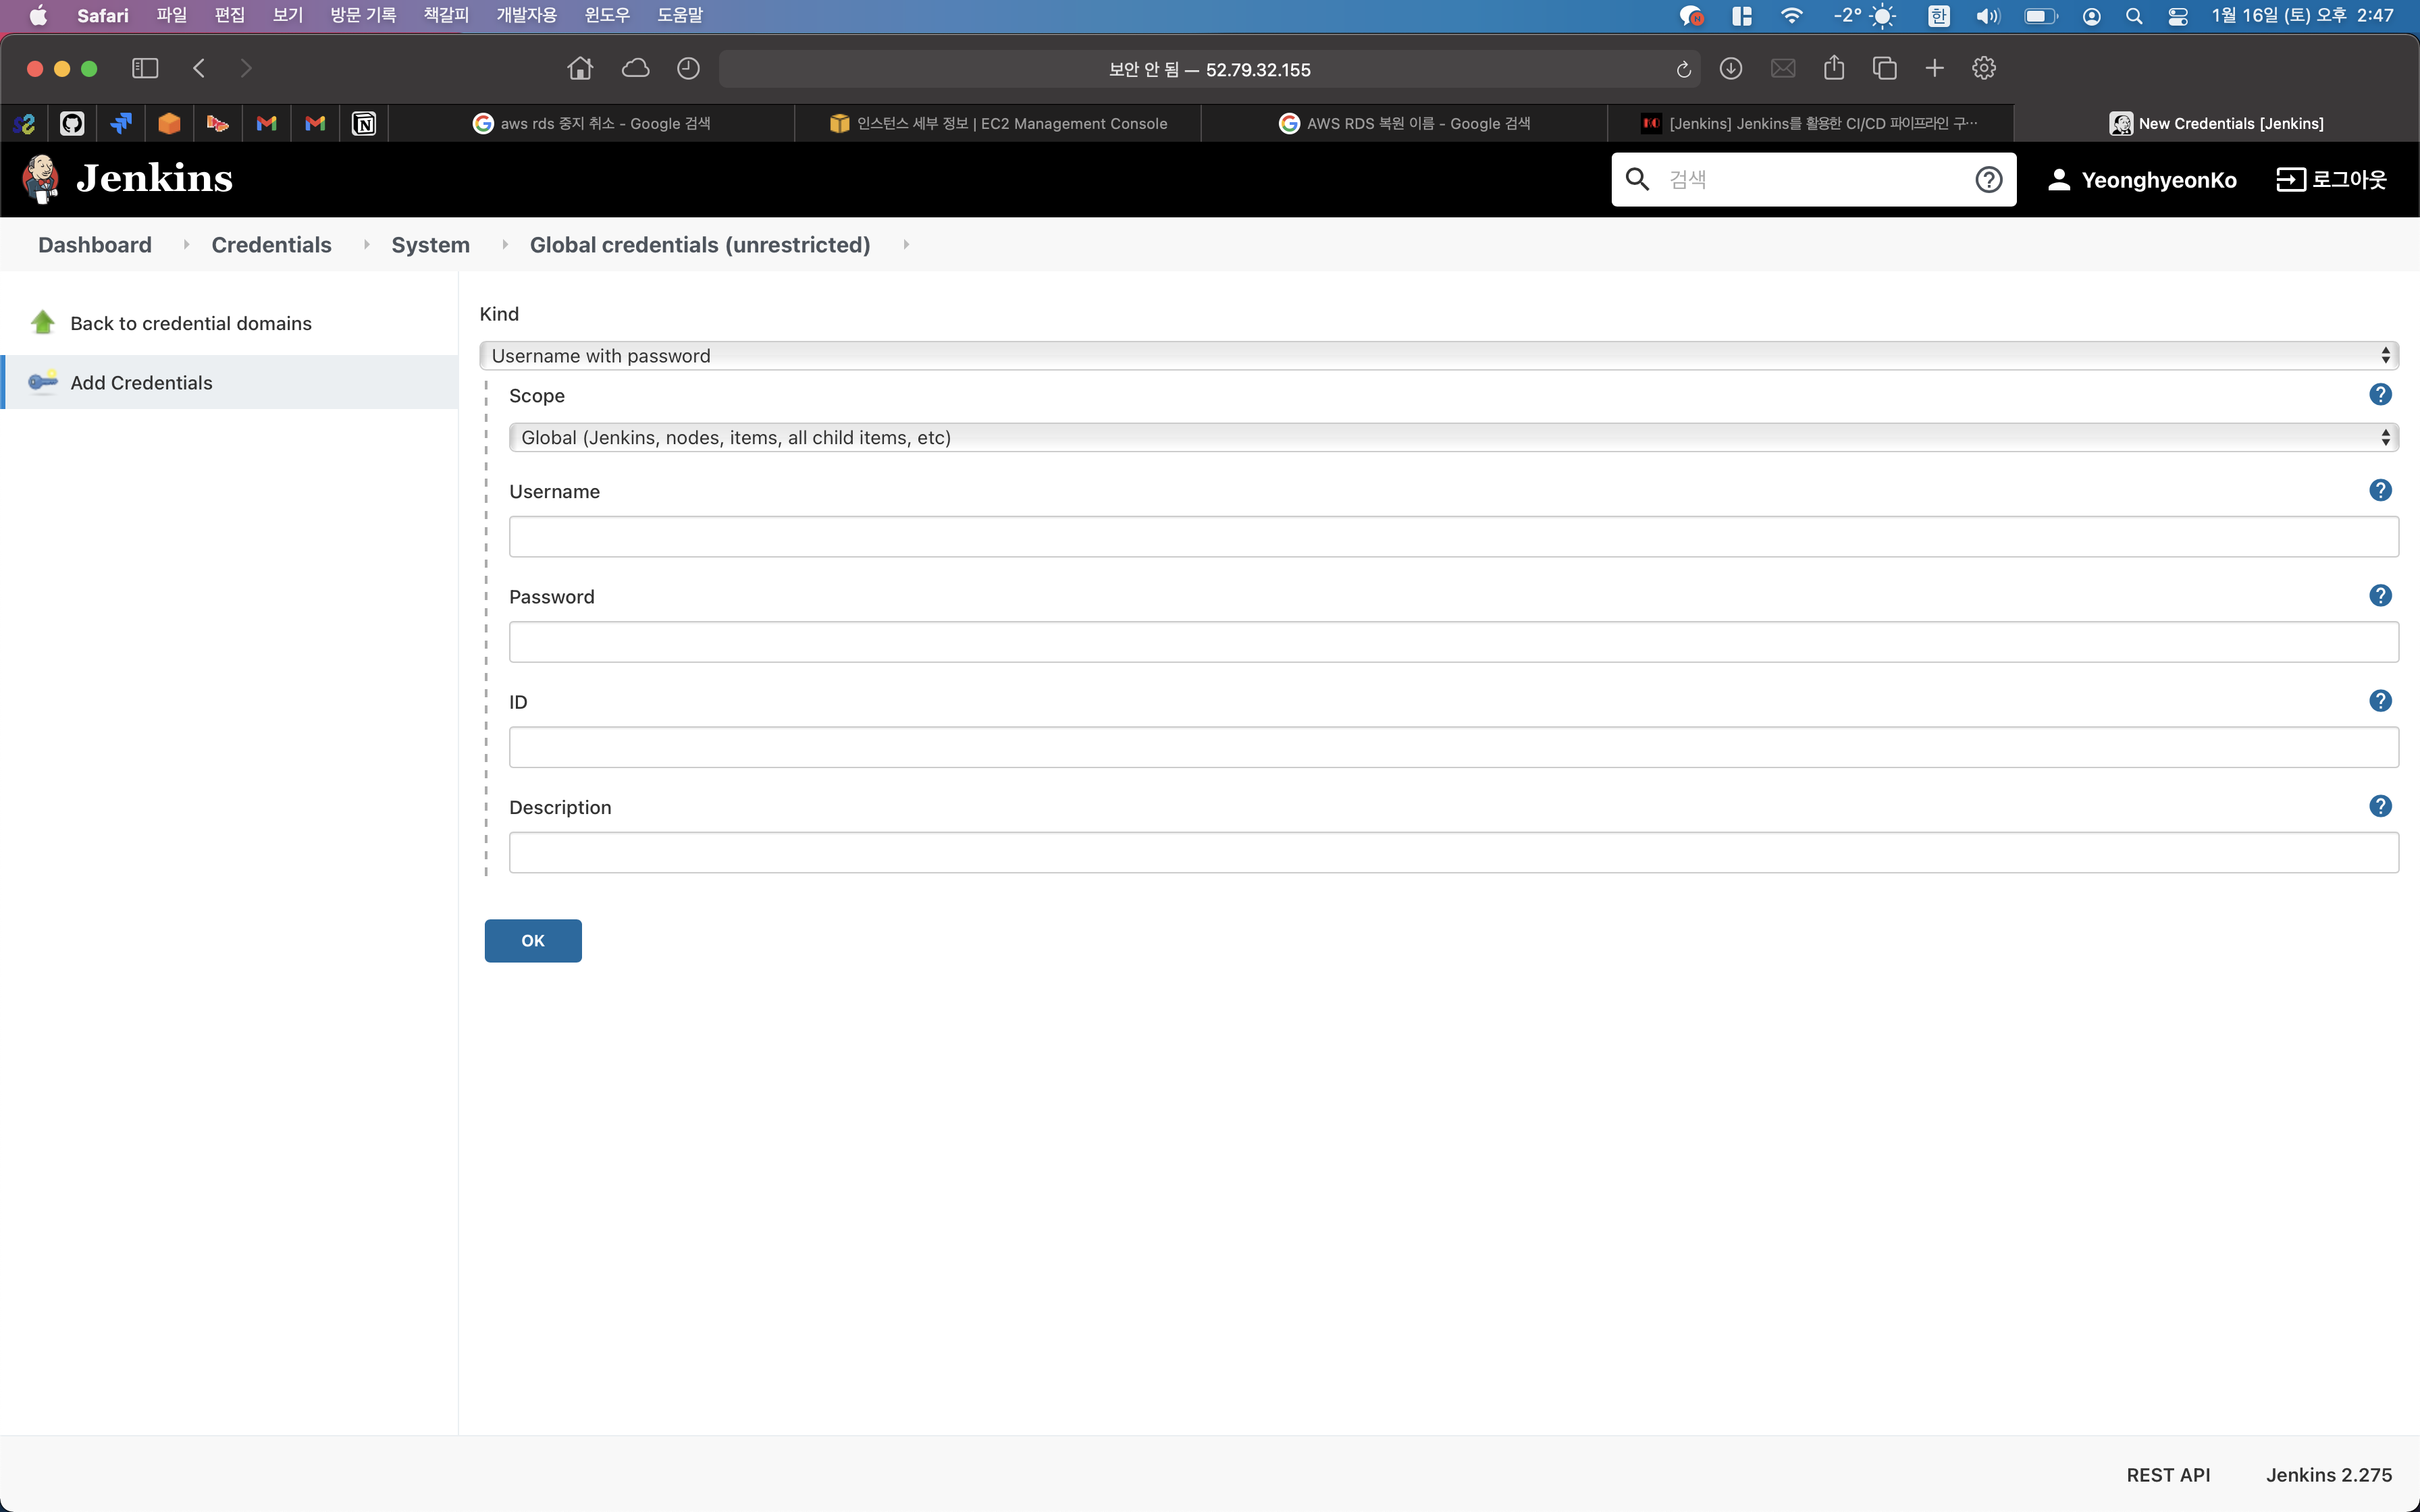
- 이제 생성된 token을 복사하여 다시 Jenkins로 돌아와 Username에는 GitHub 아이디를, password에는 token을 붙여넣는다. 이때 ID는 Jenkins가 Git에 접근하기 위한 credential의 명칭이기 때문에 자신이 구별할 수 있는 임의의 이름으로 설정하면 된다.

2. AWS Credentials 관리
-
환경변수로 AWS 정보 입력하기
-
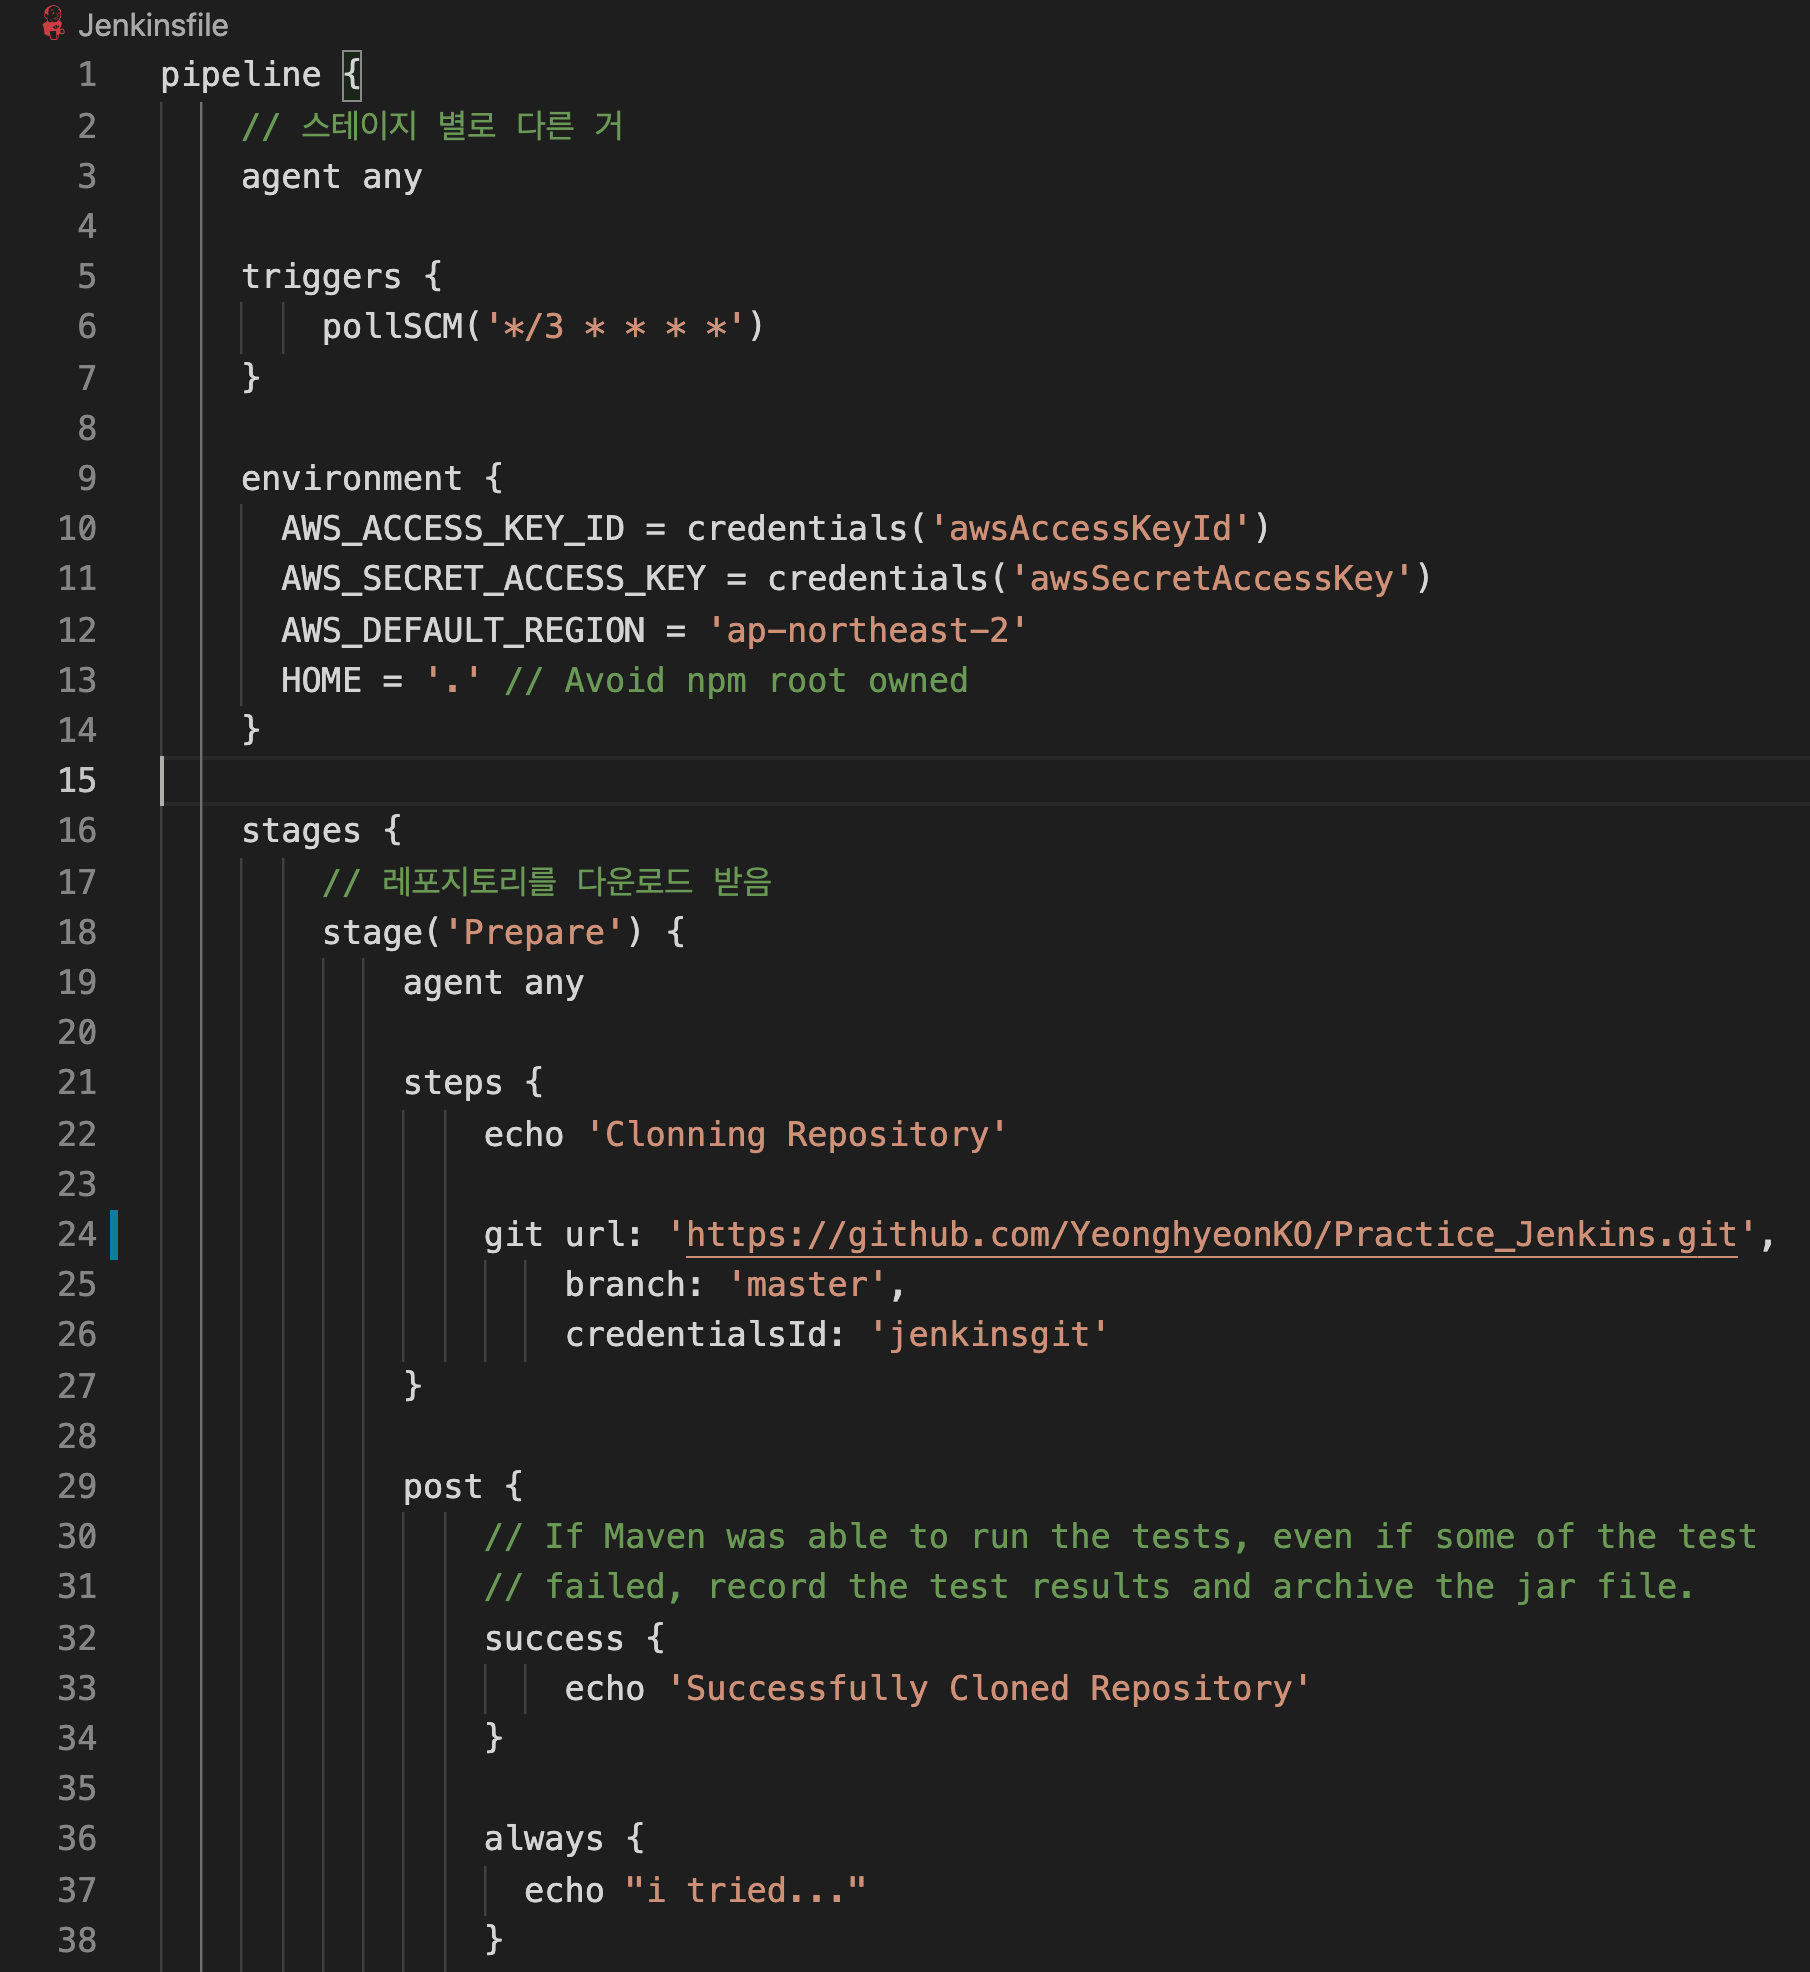
Jenkinsfile은 다음과 같은 코드로 구성된다. 하나의 pipeline 안에 agent, triggers, environment, stages가 존재하는데 일단 environment에 AWS 관련 설정을 추가할 것이다.
-
AWS IAM으로 들어가 Jenkins라는 이름의 IAM 사용자를 만든다. 사용자 이름은 임의로 설정하고, AWS 액세스 유형으로는 프로그래밍 방식 액세스를 선택한다. 다음 단계인 권한 설정에서는 Jenkins 사용자로 접근했을 때 정보를 함부로 건들 수 없게끔 세부적인 조건을 주어야하나 여기서는 편의상 기존 정책 직접 연결 탭의 AdministratorAccess를 부여한다.
-
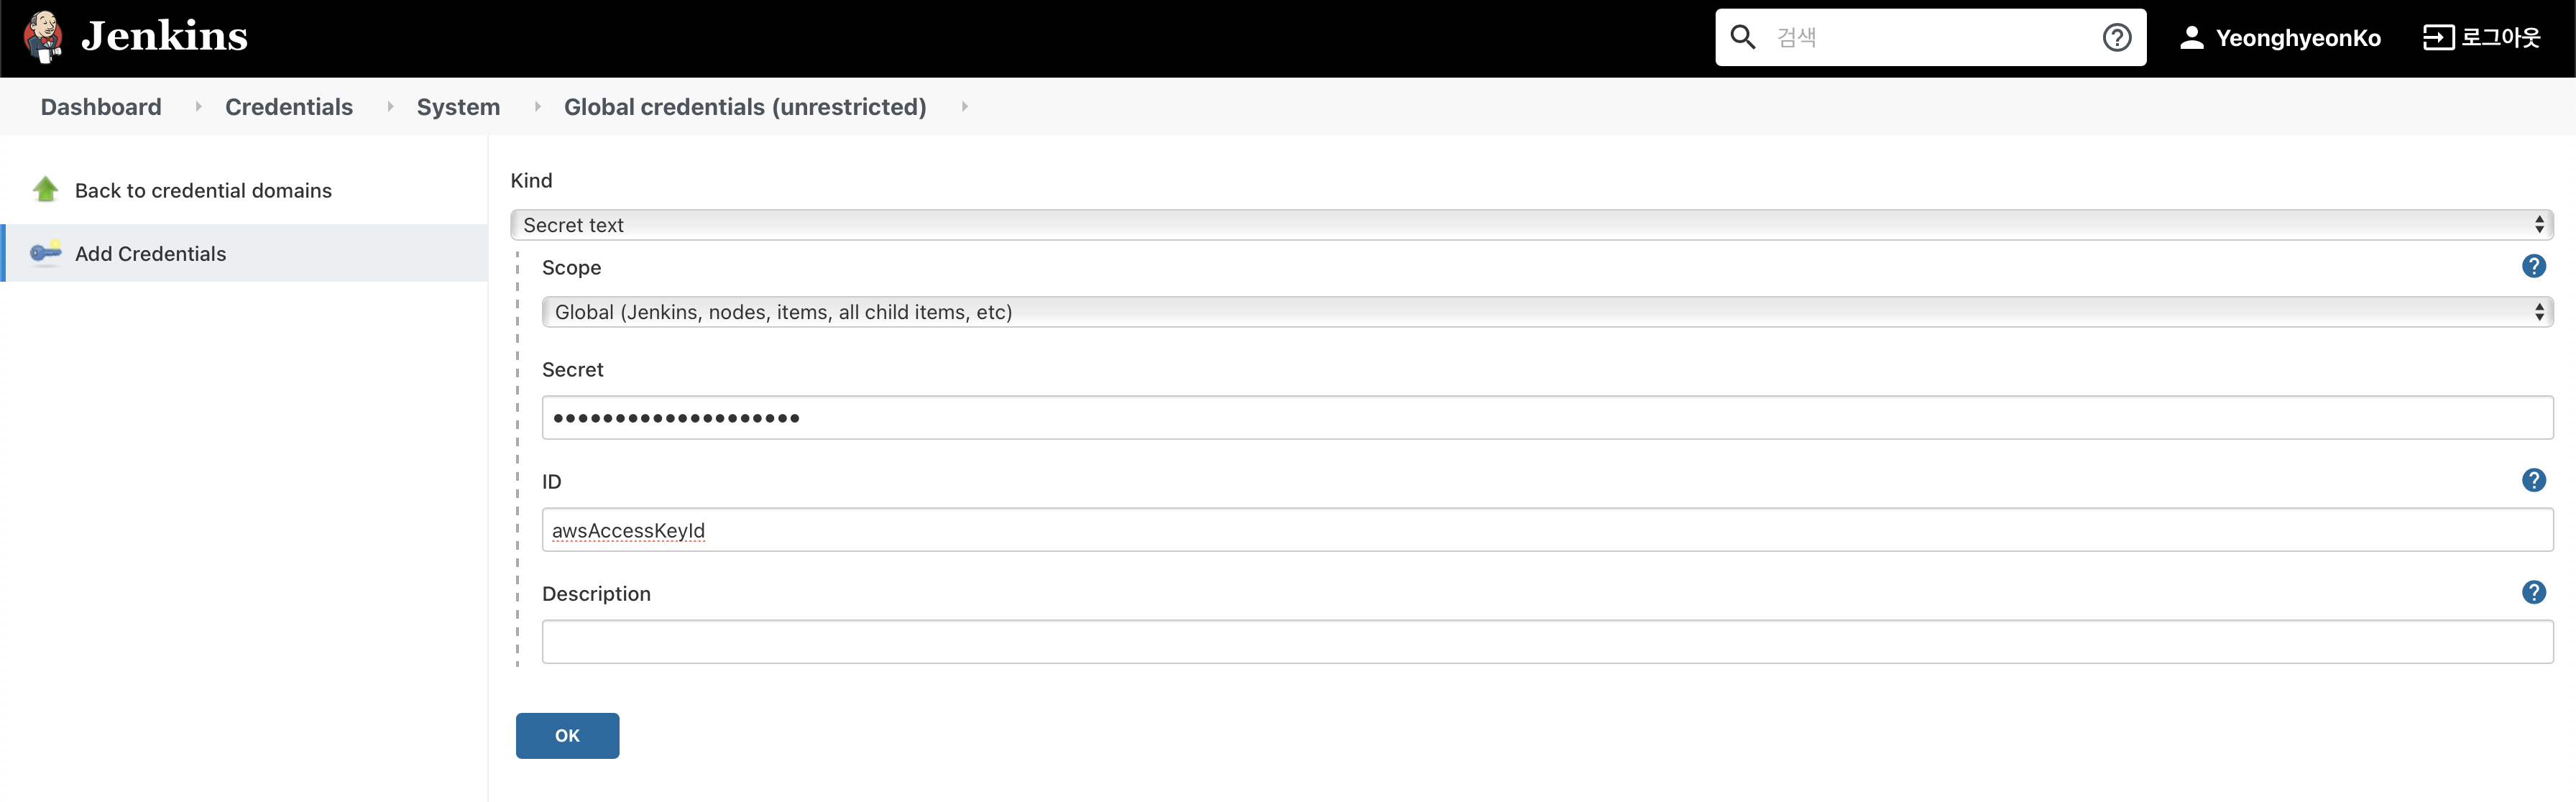
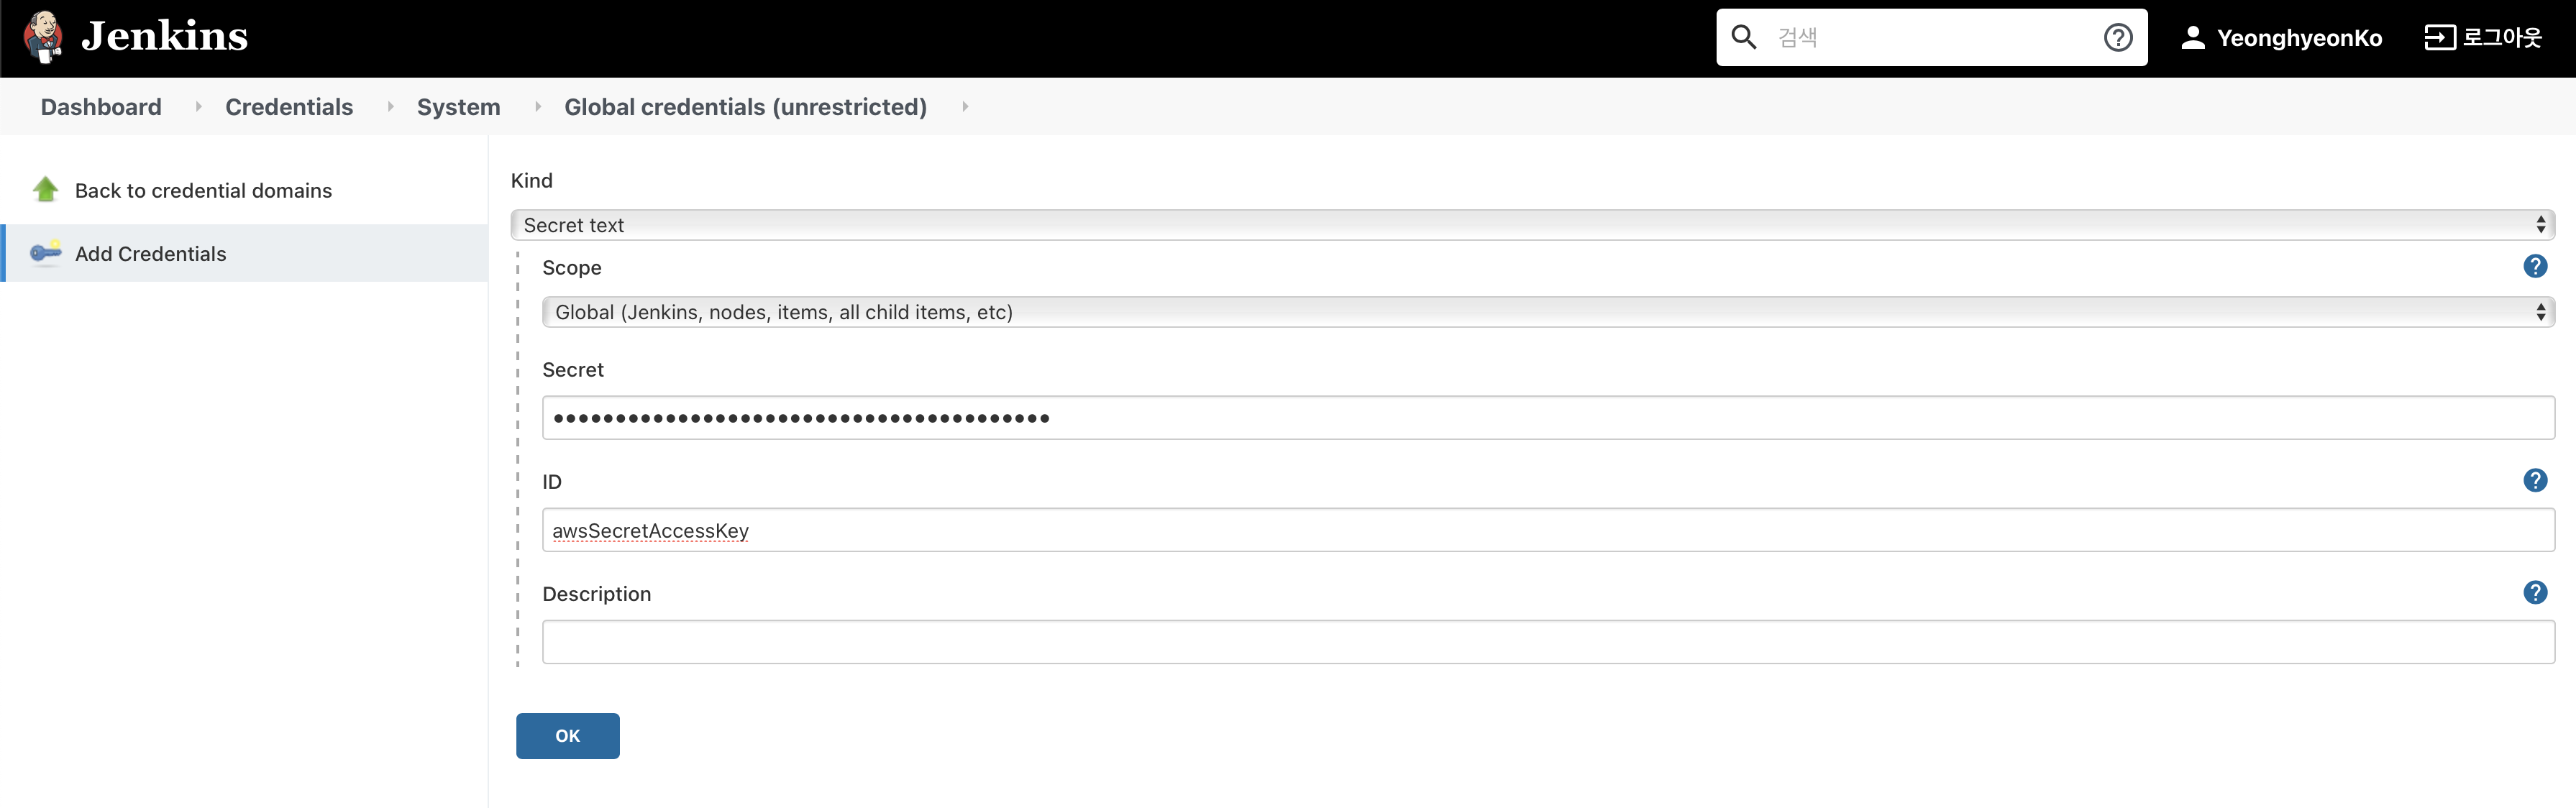
이제 생성된 IAM 사용자의 액세스 키 ID와 비밀 액세스 키를 8080번 포트의 Jenkins에 등록해야하는데, 앞서 Git 관련 Credentials를 입력했던 것과 거의 동일하다. Add Credentials에서 Secret text로 Kind를 변경하여 액세스 키 ID와 비밀 액세스 키 두 가지에 대한 Credentials를 각각 추가한다.
-
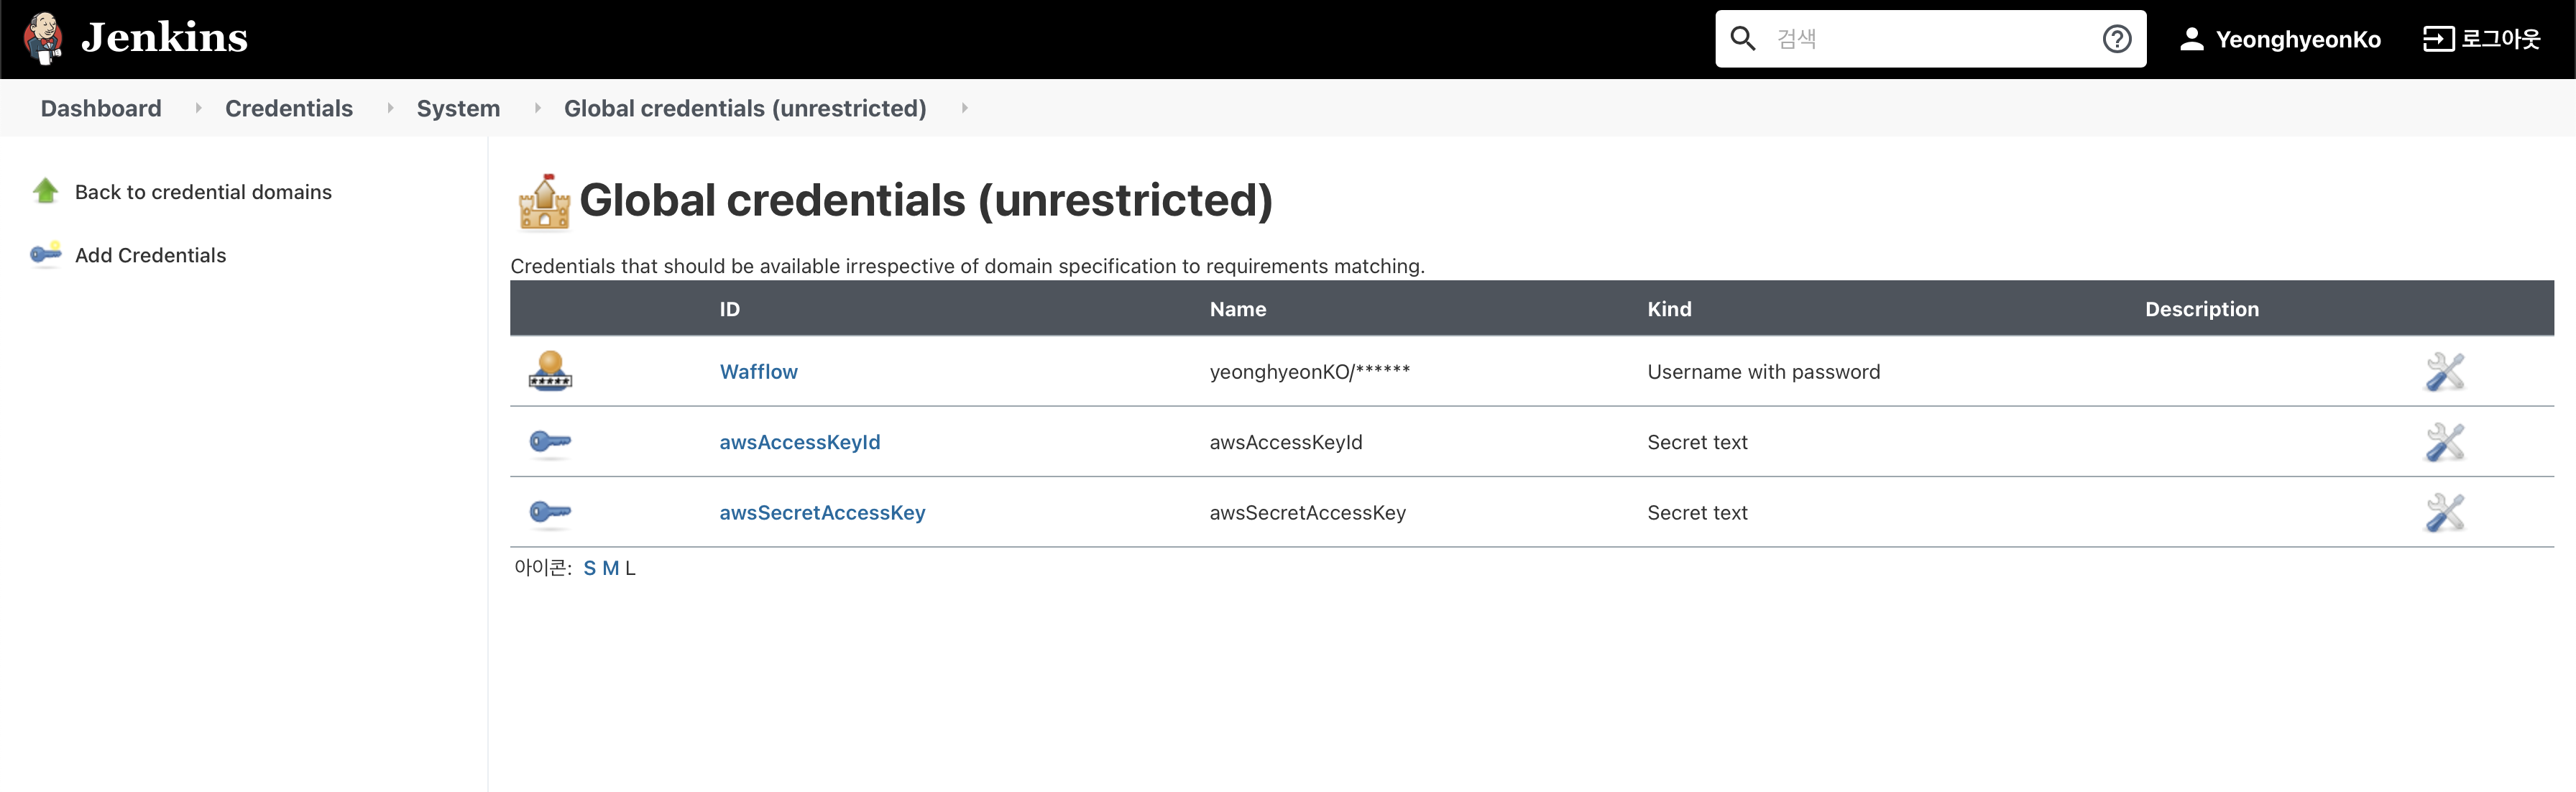
두 가지 Credential을 생성했다면 전체 credentials는 git credential을 포함하여 총 세 개가 된다.
-
이제 pipeline 내의 environment section에서 AWS 관련 정보를 불러올 수 있다!
-
environment {
  AWS_ACCESS_KEY_ID = credentials('awsAccessKeyId')
  AWS_SECRET_ACCESS_KEY = credentials('awsSecretAccessKey')
  AWS_DEFAULT_REGION = 'ap-northeast-2'
  HOME = '.' // Avoid npm root owned
}
3. Jenkinsfile stage 작성하기
-
하나의 pipeline에 여러 개의 stage가 존재할 수 있다. stage 안에도 4가지 section인 agent, steps, post, stages를 넣을 수 있다.
-
(1) repository 다운로드
- ‘Prepare’라고 명명된 stage는 지정된 git url에서 repository의 main branch를 다운받은 후 이 과정이 성공했으면
Successfully pulled Repository문구를 내뱉는다. 성공 또는 실패와 상관 없이i tried...가 출력된다. cleanup은 post section 내부의 작업이 다 끝났을 때 로그를 찍어주는 역할을 한다.
- ‘Prepare’라고 명명된 stage는 지정된 git url에서 repository의 main branch를 다운받은 후 이 과정이 성공했으면
stage('Prepare') {
    agent any

    steps {
        echo 'Clonning Repository'

        git url: 'https://github.com/YeonghyeonKO/Practice_Jenkins.git',
            branch: 'main',
            credentialsId: 'Wafflow'
    }

    post {
        // If Maven was able to run the tests, even if some of the test
        // failed, record the test results and archive the jar file.
        success {
            echo 'Successfully pulled Repository'
        }

        always {
            echo "i tried..."
        }

        cleanup {
            echo "after all other post condition"
        }
    }
}
- (2) AWS S3에 프론트엔드 static file 업로드
- 간단한 배포를 하기 위해 AWS S3 bucket에 파일을 업로드한다. 사전에 S3 bucket을 생성해야 하며, 모든 접근을 허용할 예정이다. post section의 코드는 success 또는 failure에 따라 제목과 내용이 다른 메일을 전송하는 명령어다. 메일 말고도 slackSend plugin을 사용해 어떤 channel에 어떤 color의 메시지를 전송할지 지정할 수도 있다. (참고)
stage('Deploy Frontend') {
  steps {
    echo 'Deploying Frontend'
    // 프론트엔드 디렉토리의 정적파일들을 S3 에 올림, 이 전에 반드시 EC2 instance profile 을 등록해야함.
    dir ('./website'){
        sh '''
        aws s3 sync ./ s3://wafflow-bucket
        '''
    }
  }

  post {
    // If Maven was able to run the tests, even if some of the test
    // failed, record the test results and archive the jar file.
    success {
      echo 'Successfully Cloned Repository'

      mail  to: 'dk02315@gmail.com',
            subject: "Deploy Frontend Success",
            body: "Successfully deployed frontend!"

    }

    failure {
      echo 'I failed :('

        mail  to: 'dk02315@gmail.com',
              subject: "Failed Pipelinee",
              body: "Something is wrong with deploy frontend"
    }
  }
}
-
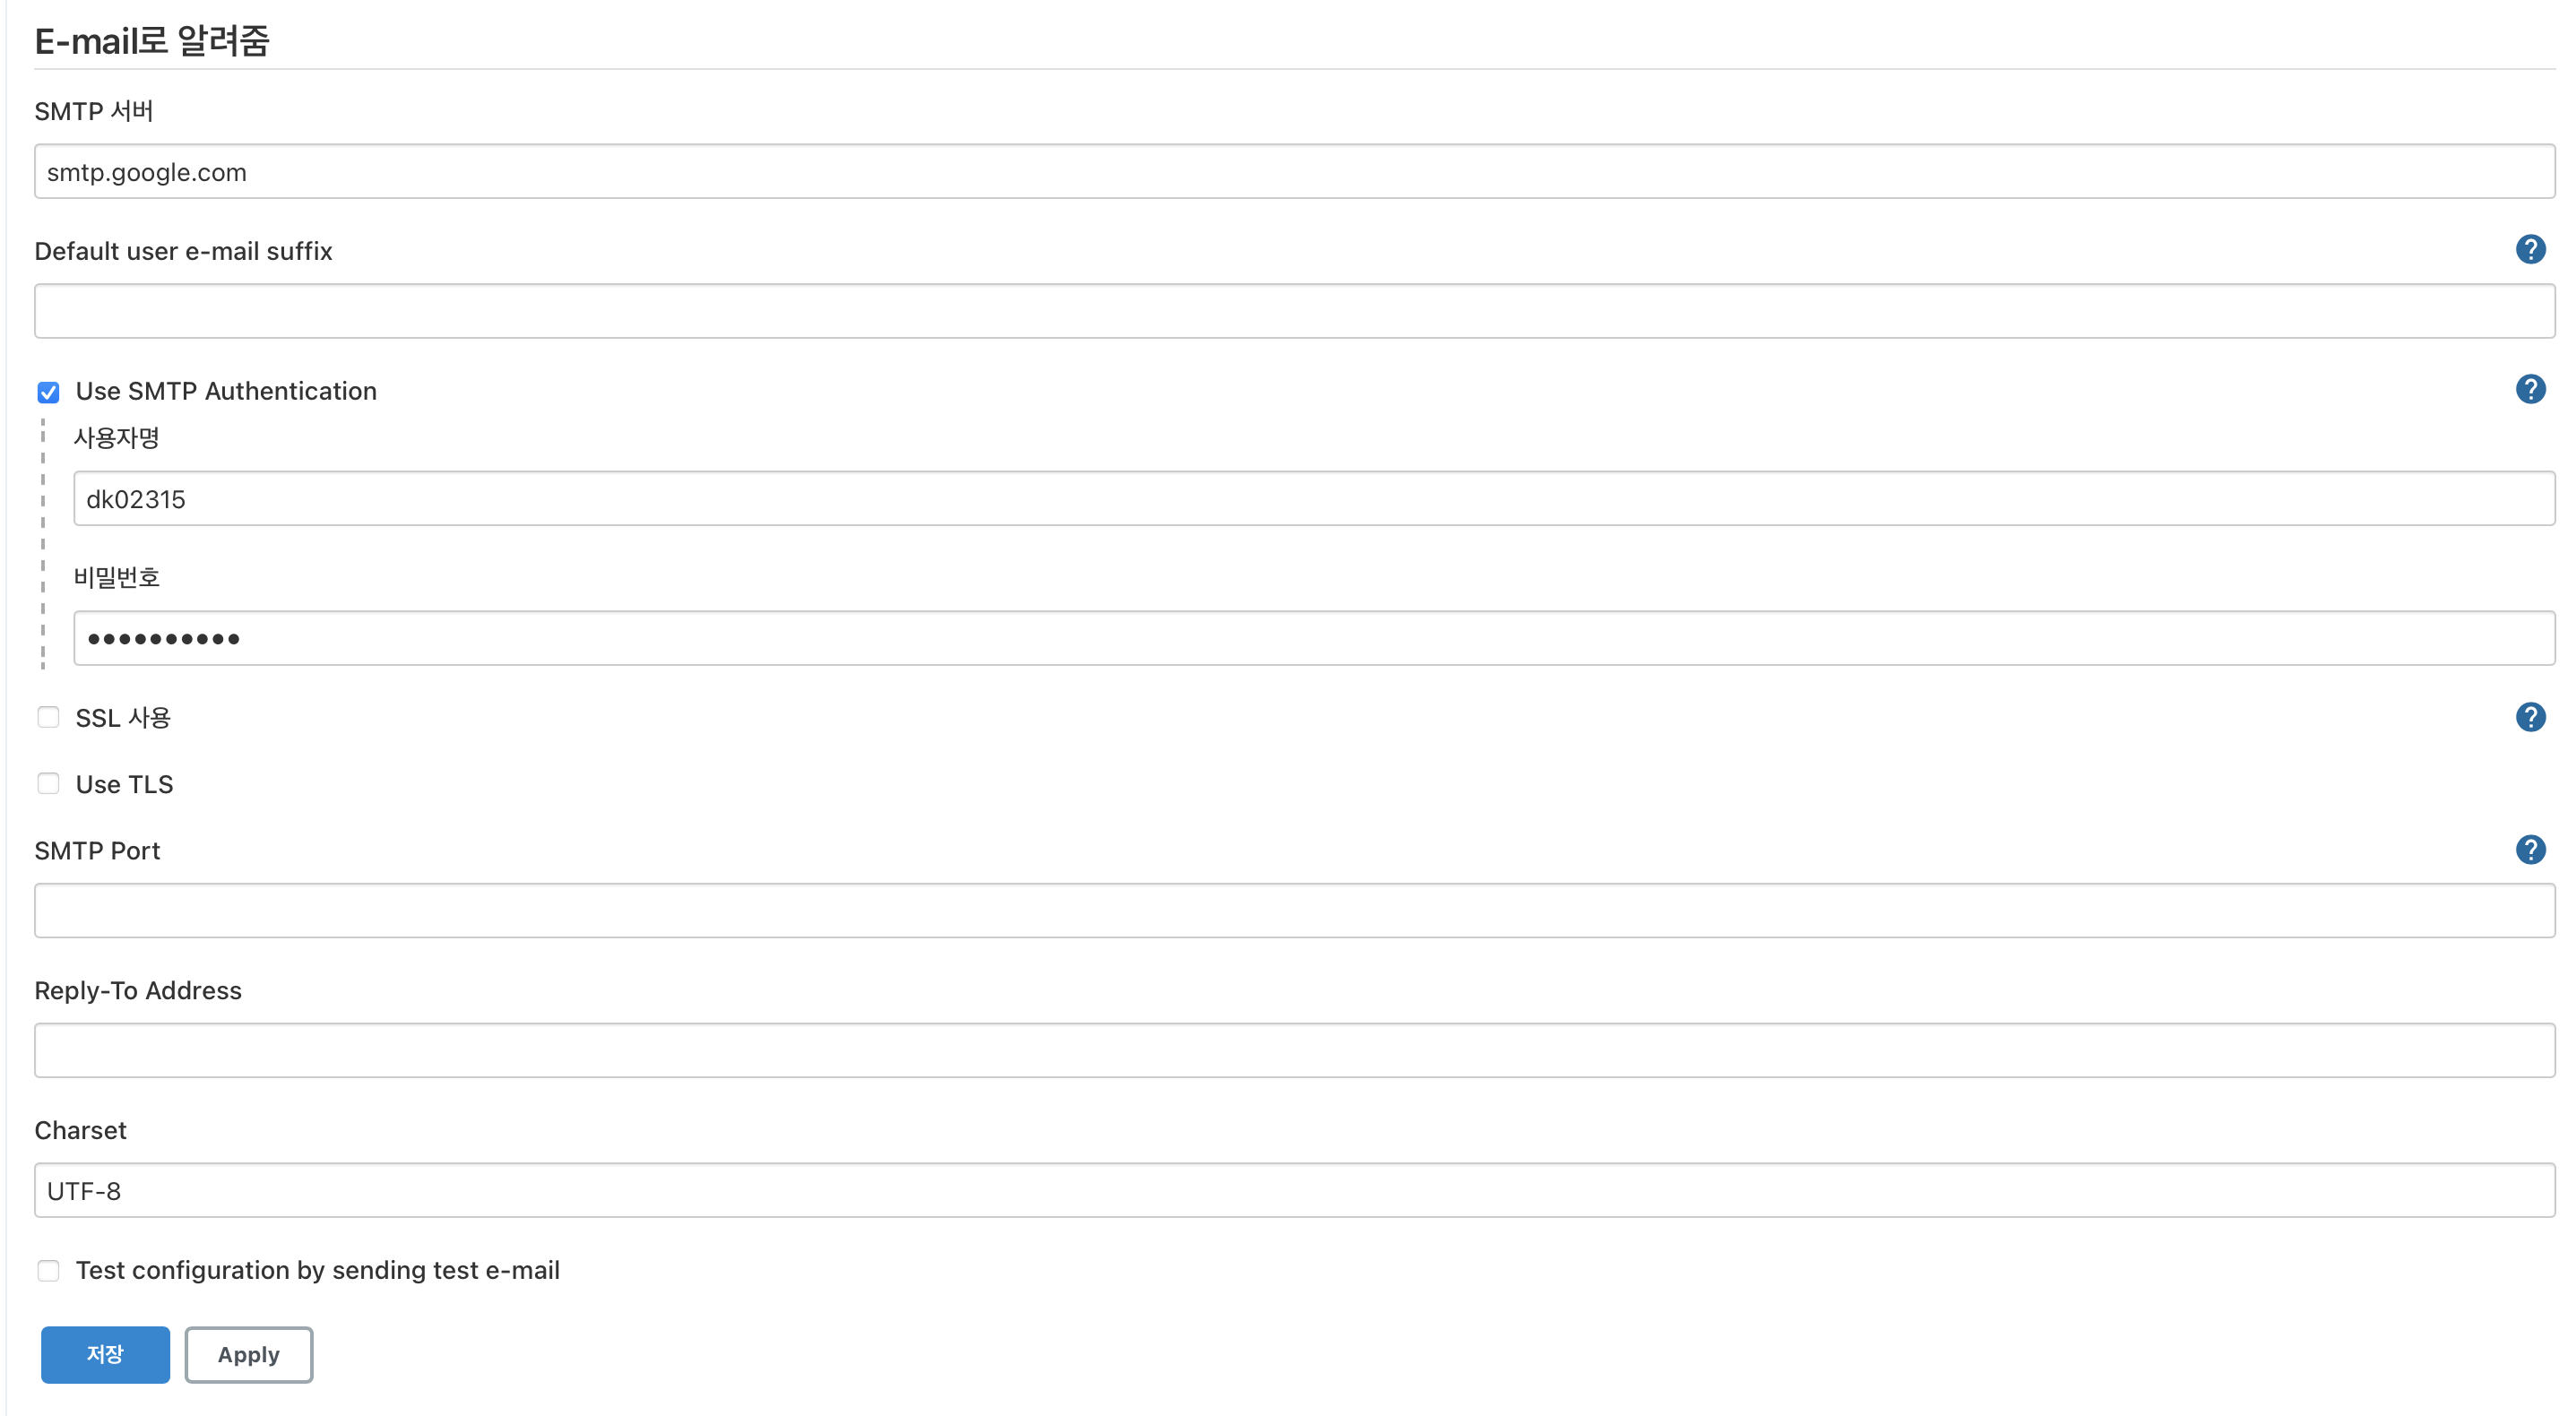
이메일은 단순히 적는다고 해서 되는 것이 아니라 Jenkins에서 따로 설정을 해줘야 한다. 8080번 포트 Jenkins의 Jenkins 관리 > 시스템 설정으로 들어가 이메일로 알려줌 부분을 아래와 같이 적당히 채워넣으면 된다.
-
(3) Backend file 빌드하기
-
server는 단순히 정적 파일 배포가 아니라 도커를 빌드할 예정이므로 /server 디렉토리 내에서
docker build명령어를 통해 PROD 환경에서 빌드하게 된다. 참고로 Jenkins 입장에서는 DEV 환경인지, PROD 환경인지만 알고 배포를 하고 나머지 build 관련된 파라미터들은 키 관리 매니저 등 application level에서 관리하는게 깔끔하다는게 개인적인 생각이다. -
아래 코드의 post section에서 failure 시에 error를 보내도록 했는데, 앞서 echo와 다르게 빌드 도중 에러가 난 상태로 진행되면 안되기 때문에 echo 대신 error 명령어를 설정했다.
-
stage('Bulid Backend') {
  agent any
  steps {
    echo 'Build Backend'

    dir ('./server'){
        sh """
        docker build . -t server --build-arg env=${PROD}
        """
    }
  }

  post {
    failure {
      error 'This pipeline stops here...'
    }
  }
}
-
(4) Backend file 배포하기
- 위에서 만든 도커 이미지를 실행하는 단계다. 단,
docker rm -f $(docker ps -aq)는 원래 떠있던 이미지를 지우는 명령어이므로 처음 수행 시 해당 명령어가 있으면 fail할 것이고, 두 번째 시행부터는 생성된 이미지를 지울 수 있으므로 상관 없다.
- 위에서 만든 도커 이미지를 실행하는 단계다. 단,
stage('Deploy Backend') {
  agent any

  steps {
    echo 'Build Backend'

    dir ('./server'){
        sh '''
        docker rm -f $(docker ps -aq)
        docker run -p 80:80 -d server
        '''
    }
  }

  post {
    success {
      mail  to: 'frontalnh@gmail.com',
            subject: "Deploy Success",
            body: "Successfully deployed!"

    }
  }
}
이제 네 번째 포스트에서 우리가 만든 Jenkinsfile이 실제로 어떻게 돌아가는지에 대해 살펴볼 것이다.
참고자료 : T-Academy Jenkins를 활용한 CI/CD
Comments